Google Tag Manager
Track Klaviyo Forms with Google Tag Manager
By:
Raj Gurung
Published On :
January 31, 2024

Klaviyo Forms, at the forefront of personalized email marketing, empowers businesses to forge impactful connections. These dynamic forms, designed for lead capture and customer engagement, are the key to elevating your email campaigns. In our latest blog, discover how the seamless integration of Klaviyo Forms with Google Tag Manager (GTM) unlocks a world of insights, enhancing your marketing strategies. Harness the power of this synergy to transform data into actionable intelligence!
To set up this tracking, firstly you need to set a few things-
- Setting up GA4 on your website
- The base GA4 tag needs to be installed on your website
- Setup and install Google Tag Manager need to be installed on your website
- and install all the [[Important]] plugins on your website for analytics
Event listener
event listeners are the type of event in Google Tag Manager that openly listens to events such as form submissions or button clicks.
event listeners are mostly used for form submission if you are using third-party plugins such as Ninjaforms, contact7 form, or Klaviyo.
There are various ways you can track a form submission. you can see the form submission in GTM
As you know Google Tag Manager has its form submission variables that you can enable by going to Variable and clicking on Configure
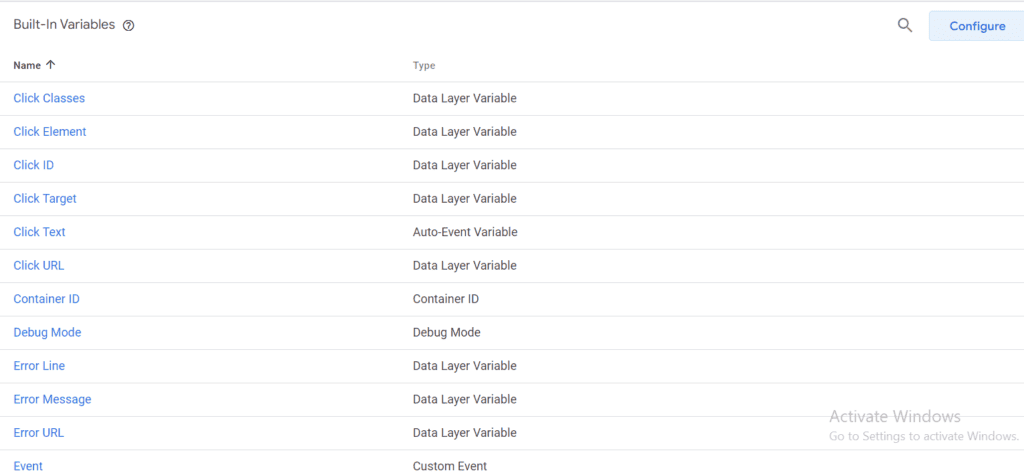
However, some of the form submissions are not visible using the built-in variable mostly if you are using the third-party plugins.
There are various ways of tracking the form submission such as button click, element visibility trigger, or the landing page.
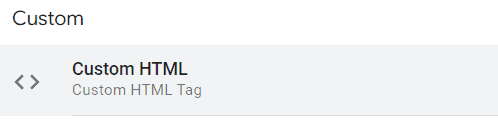
But in our case, we are going to the Custom HTML in Google Tag Manager, where we can enter our own custom JavaScript to push the form data to the data layer.
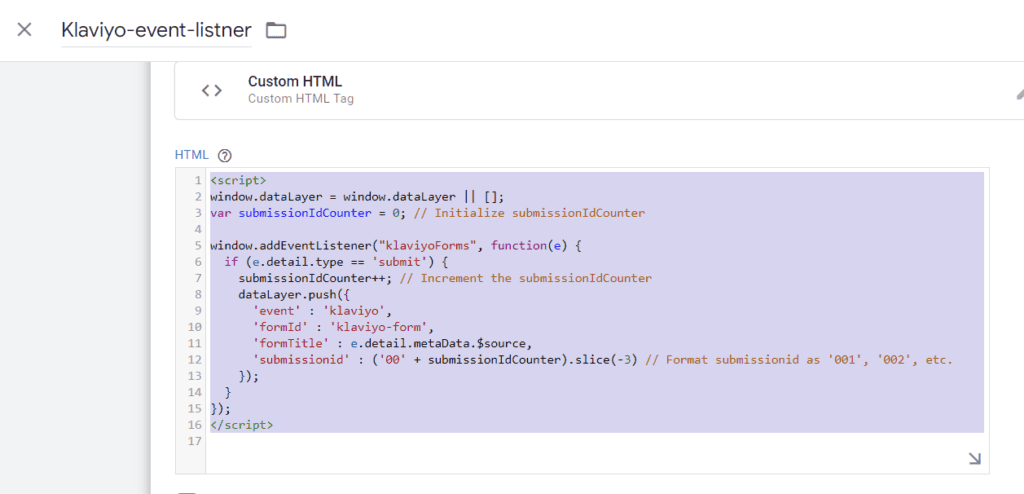
Creating the Event listener
Now we will create our listener function.
- Firstly go to Tag
- Click on New Tag
- Select the Tag Configuration
- Select Custom HTML
- After selecting the tag you need to copy and paste the following code into the space.
<script>
window.dataLayer = window.dataLayer || [];
var submissionIdCounter = 0; // Initialize submissionIdCounter

window.addEventListener("klaviyoForms", function(e) {
  if (e.detail.type == 'submit') {
    submissionIdCounter++; // Increment the submissionIdCounter
    dataLayer.push({
      'event' : 'klaviyo',
      'formId' : 'klaviyo-form',
      'formTitle' : e.detail.metaData.$source,
      'submissionid' : ('00' + submissionIdCounter).slice(-3) // Format submissionid as '001', '002', etc.
    });
  }
});
</script>
After you paste the code choose the trigger as all page
Give it a name and save it.
Now you can test the trigger by using Preview and completing the form
and in your preview screen, you will see a new event called Klayviyo

Now you can see all the data in the data layer of the event.
The one we need are: formId and submissionid
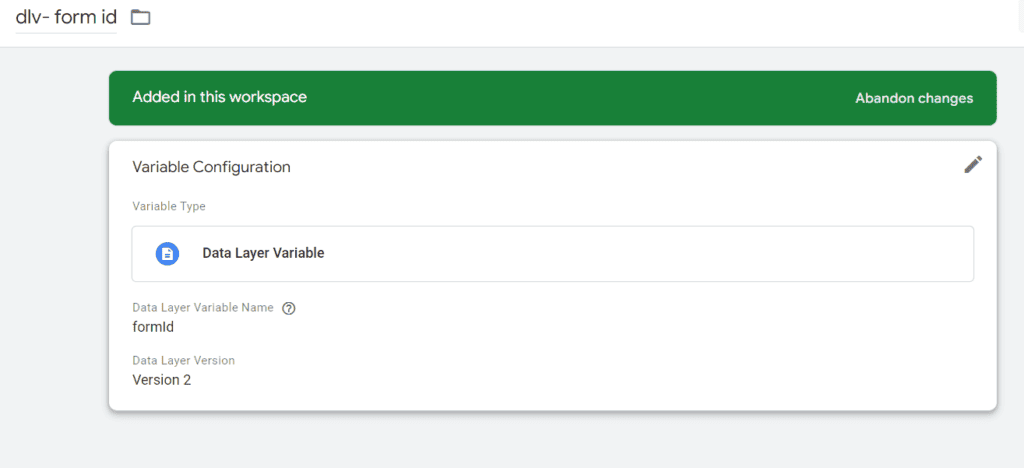
Creating Variables.
Now from the data in the datalayer, we will create the data-layer variable.
- Go to Variable
- Click on New User Define Variable
- Then select the Datalayer variable
- And give the variable name formid
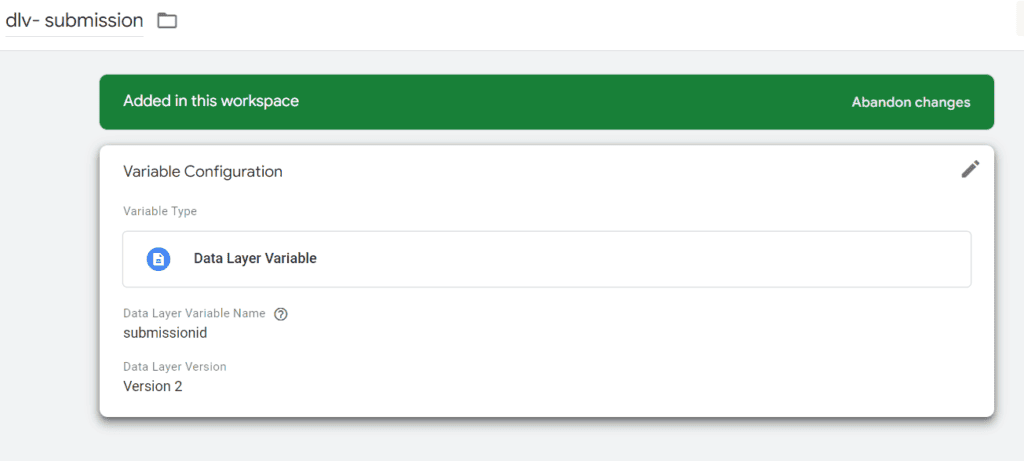
Again do the same for the submissionid
- Click on New User Define Variable
- Then select the Datalayer variable
- And give the variable name submissionid
Creating Trigger
Now we will create a new trigger that will fire when klaviyo’s form gets submitted
- Go to Trigger
- Click on the New Trigger
- Choose the Trigger Configuration as Custom Event
- And give the event name klaviyo same as you saw in your preview window
- Give the trigger a name and Save
Creating Tag
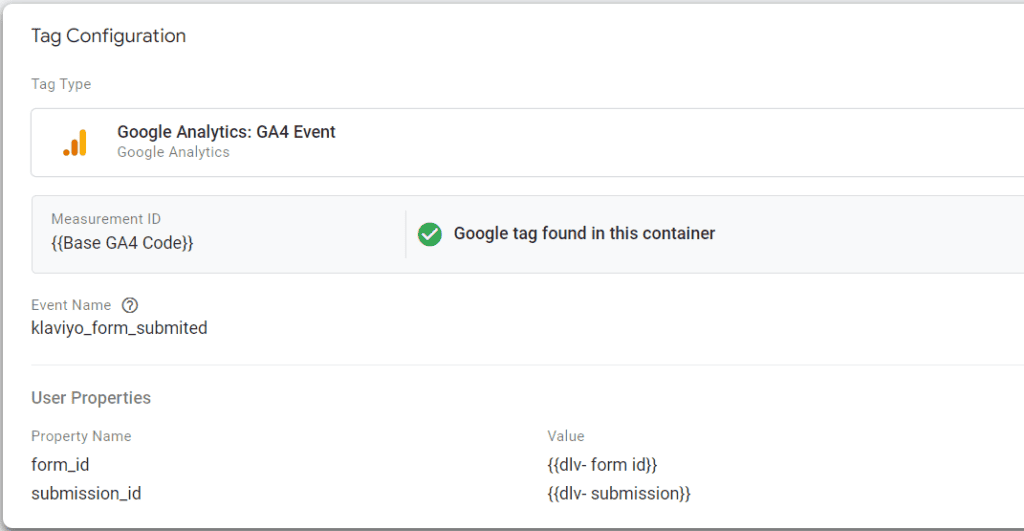
Finally, we will create a tag and send all the information to Google Analytics 4
- Go to Tag
- Click on New Tag
- Chose the Tag configuration as Google Analytics: GA4 Event
- Give the event name as klaviyo_form_submited
- And choose the User Properties
Property Name: form_id
Value: {{dlv-form id}} Property Name: submission_id
Value: {{dlv-submission id}} - Choose the trigger that we created
- Give the name and save the Tag
- Save
Google Analyics 4 Debug View
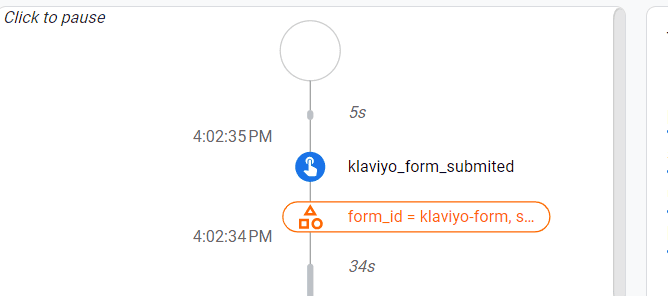
Now you can test your tag by going to the Preview mode or going to Debug mode on your GA4
Do not forget to Publish your workspace and save all your tags and trigger

Humming Web
Let’s talk about your business goal and align the solution we provide with our digital marketing services.
FREE strategy callOur Services
© Humming Web. All Rights Reserved